
Gmail is one of the most popular and commonly used email clients which help to manage emails, documents etc.
EML is a file format used to store email messages along with header, footer, hyperlinks etc.
EML to Gmail conversion can be done both by manual method or software methods. In this article, we are describing both the methods for you.
Manual method to convert EML to Gmail by configuring Gmail in Thunderbird
- Go to Gmail account and click on the gear icon to navigate the settings
- Click on settings and under forwarding POP/IMAP, enable IMAP option
- Open Thunderbird, Click File > New > Existing mail account
- Provide credentials of Gmail account and configure it in Thunderbird
- Select EML files from Thunderbird to Gmail. EML files are saved in Gmail and you can easily access them
Limitations of Manual method
- Thunderbird installation needed
- Need technical knowledge
- Lengthy and time-consuming process
- Complex procedure, not easily understood
(Also see: How to Convert PDF and Printed Documents to MS Word)
Software technique to export EML to Gmail
Softaken EML to Gmail Importer is the best and effective utility to migrate EML files to Gmail without taking much time and efforts. The software is capable to connect with Gmail in no time and perform the whole conversion rapidly. With the help of this utility, you can easily migrate all size EML files which can create a problem if you use the manual method for it.
Benefits and feature of EML to Gmail Importer
- Effortless export of EML files to Gmail
- Export EML files and attached files
- Provide selective EML file migration
- Support Windows and all its versions
- Work without any interruption
- Bulk conversion of EML files
Working of EML to Gmail Importer
Step1. Easy adding of EML/EMLX files
You can download the software from the this link
Download and install the software successfully and you will see the software interface.
Now the software asks you to swiftly add EML/EMLX files to the wizard as per your requirements.
(Also see: What do You need to do on Your iPhone before selling?)
The software after loading of files to the wizard shows a clear preview of all files which you have selected to export. This will help you to check the accuracy of data files.
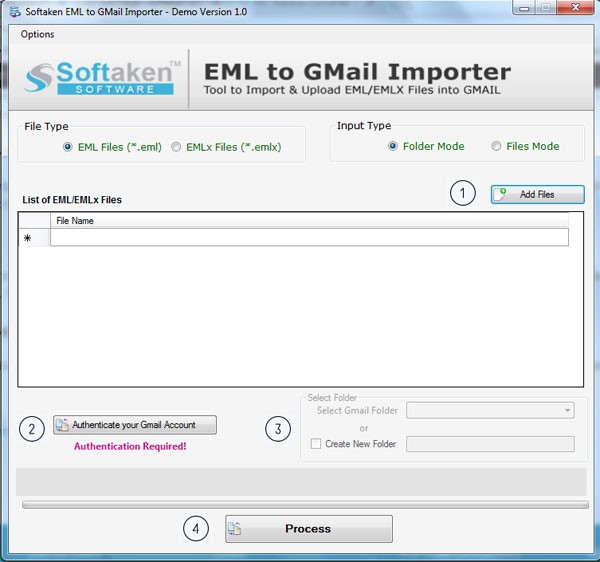
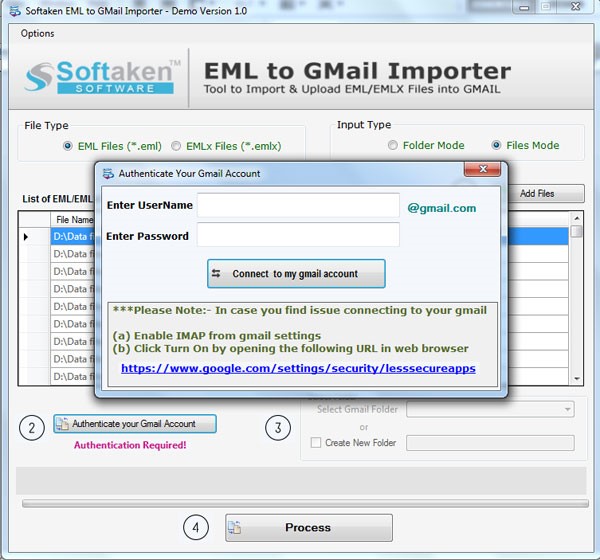
Step 2. Authenticate your Gmail account
The software asks for an email address and password and swiftly connect to your Gmail account.
Step 3. Selection of Folder to save the exported files
In this step, you are required to select a particular folder to save EML/EMLX files. You can create a new folder and save exported database to Gmail account. This will help you in easy identification of the files.

Step 4. Process
This is last and final step in EML to Gmail import. Once you move cursor to ‘process’ button. It will start executing the process and completes it into few minutes.
(Also see: Few Steps to Format and Restore your Android Mobile Effectively)
Conclusion
We have discussed both manual and software techniques to assist you in EML to Gmail conversion. The software approach will help you to export multiple EML/EMLX files to Gmail whereas the manual approach is helpful only in case of less amount of data. Software approach is simple and fast in comparison to the manual approach.


Thanks for sharing this in here. You are running a great blog, keep up this good work.
Good job and thanks for sharing such a good blog You’re doing a great job. Keep it up !!