 Vipin PG
Somewhere on YouTube right now, someone is prying open a phone with a butter knife, and you can tell within the first ten seconds how that video is going to end. It’s not that they’re careless. It’s that phones don’t look like they need special tools. They look like small, flat rectangles of glass and metal — how different can opening one really be from opening a battery compartment on a TV remote?
Quite different, actually. The screws alone come in at least three or four shapes depending on the phone, the adhesive holding the screen down is closer to industrial glue than tape, and there’s a battery a few millimetres away from where most people start prying. None of that is obvious from the outside, and that’s exactly why the wrong tool doesn’t just fail to work — it actively damages things a right tool never would have touched. A basic set of mobile repair tools solves most of this before it becomes a problem, but very few first-timers own one, and that’s where the trouble usually begins.
The screws are the first thing people get wrong
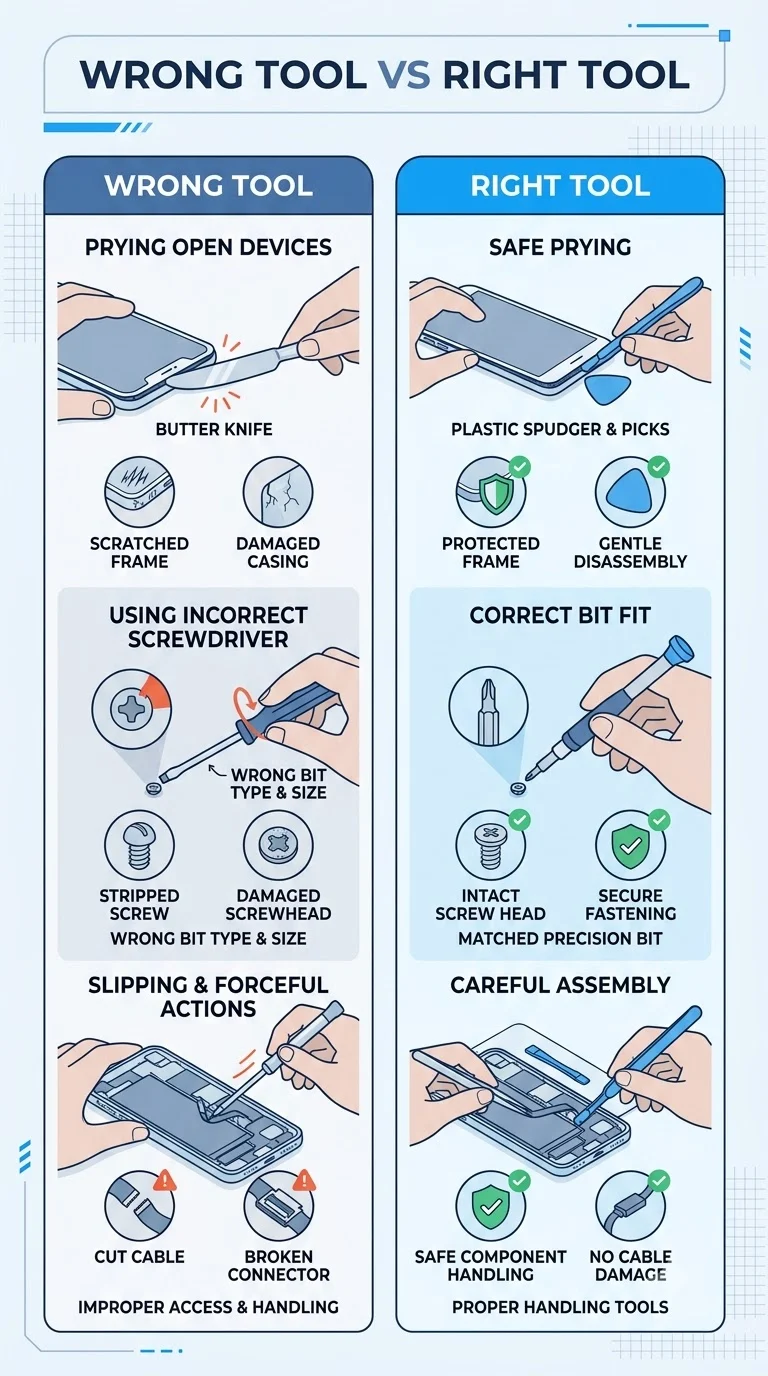
Every phone uses a handful of screw types that look almost identical to the naked eye but need completely different bits. iPhones mostly use a five-point Pentalobe screw on the outside and tiny tri-point screws on internal shields. Android phones lean more toward Phillips or Torx heads depending on the brand and model. A regular hardware-store screwdriver doesn’t match any of these precisely — it’s either too wide, too narrow, or the wrong shape entirely.
Here’s what actually happens when the fit is off: the driver slips inside the screw head before it turns the screw, and each slip shaves a tiny bit of metal off the inside of that head. Do this two or three times and the screw is now smooth on the inside — nothing will ever grip it again. At that point the only way out is drilling it, which is a repair in itself, done to fix a problem the drill just created.
What you can’t see is usually worse than what you can
Scratched screws are annoying but visible. The damage that actually ruins phones tends to happen somewhere you’re not looking. Two things cause most of it.
The first is static electricity. It sounds dramatic to say a spark you can’t even feel can kill a chip, but that’s genuinely how sensitive some components on a logic board are. Repair benches use anti-static mats and wrist straps for this exact reason — not as a formality, but because a phone that powers on fine right after a repair can develop random shutdowns or charging faults weeks later from static damage nobody noticed at the time.
The second is prying with metal instead of plastic. A butter knife or a flathead screwdriver cuts through adhesive just fine, but it also doesn’t know the difference between glue and a ribbon cable sitting a few millimetres below it. Cut through one of those thin gold connectors and a feature just quietly stops working — the fingerprint sensor, the face camera, sometimes the whole display. It’s rarely obvious which cable got nicked until you’re reassembling and something that used to work no longer does.
Heat is where good intentions cause the most damage
Adhesive under a phone screen is meant to soften with warmth, and this is genuinely useful information — the problem is what people use to apply that warmth. A hairdryer on full heat, a lighter, or just leaving the phone in direct sun for twenty minutes are all common shortcuts, and all three apply heat unevenly and with no real control over the temperature.
OLED displays in particular don’t forgive this. Push them a little too hot for a little too long and you get a faint dark patch or a strange tint in one corner that wasn’t there before — permanent, and only visible once the screen is back on. A controlled heat mat or a proper heat gun set to a safe range does the same softening job without pushing the display anywhere near that threshold, mainly because it warms gradually and evenly instead of blasting one spot.
The mistake that ruins reassembly, not the repair itself
This one has nothing to do with tool quality and everything to do with habit. Phone screws are different lengths depending on where they came from, and it’s tempting to just toss them all in one pile since you’ll “remember” which went where. Almost nobody actually does. Put a screw back in the wrong hole and it either doesn’t seat properly or, worse, it’s slightly too long and punctures something on its way down — a battery, a small flex cable, a shield underneath.
A cheap magnetic tray with a few compartments fixes this completely, and so does the far simpler habit of taking a photo before removing anything. Neither costs money to speak of. This is really a discipline problem disguised as a tools problem, and it’s one of the easiest mistakes to avoid entirely.
Why cheap tools cause the same problems as no tools
There’s a version of this mistake that looks like doing everything right. Someone buys a repair kit, but it’s the cheapest one available, and the bits are made from soft metal that rounds off after two or three uses — basically recreating the exact stripped-screw problem a proper kit was supposed to prevent. Investing a bit more in dependable phone repair tools rather than the bargain-bin version isn’t really an upsell — it’s the difference between a kit that lasts through dozens of repairs and one that fails partway through the first.
The same goes for opening tools. A soft, flexible plastic pick that bends before it cuts adhesive just makes the job take longer and increases the temptation to reach for something sharper and more dangerous instead — which is usually how the metal-tool mistakes from earlier happen in the first place.
Signs the wrong tool already did damage
A few things are worth checking for after any DIY repair, wrong tools or not:
- The phone charges normally but loses connection intermittently — often a nicked charging port cable
- A faint shadow, tint, or dead pixel cluster in one area of the screen — usually heat damage
- Random reboots or a battery that drains faster than before — sometimes static or a slightly bent battery from prying too close to it
- The screen sits slightly raised at one edge — a sign the frame or adhesive wasn’t seated correctly, which also breaks water resistance even if the phone looks fine
None of these show up the moment you close the phone back up. That delay is exactly what makes wrong-tool damage so easy to dismiss as “it worked” when it really just hasn’t failed yet.
When it’s smarter to just take it to someone else
Not every repair is a good DIY candidate, and that’s not a knock on doing it yourself. Water damage, board-level faults, or anything that needs microsoldering is a different category of work entirely — it usually needs equipment most people will never own for a single repair, plus experience reading a board that isn’t obvious from a tutorial. Screen replacements, battery swaps, and port cleaning are genuinely fine to attempt with the right basics. Anything involving the motherboard itself is where the cost of a mistake stops being “a scratched screw” and starts being “a phone that’s now worse than before you touched it.”
The bottom line: a phone that survives a repair with the wrong tools usually looks fine on the surface. The damage shows up later, in small ways that are easy to blame on the phone getting old rather than on the screwdriver that didn’t quite fit two weeks earlier. None of it takes much to avoid — the right screwdriver bits, a plastic pick instead of metal, a bit of patience with heat, and a tray to keep screws sorted. That’s really the whole difference between a repair that holds up and one that quietly falls apart.