

If you use TP-Link Omada devices, you might know that Omada devices work excellently with the Omada Controller. But the issue with TP-Link is that you need to have a separate controller device installed at your home to centrally manage all the devices within the network. Many other network device brands, like Grandstream, offer free cloud-based controllers to manage the home network.
TP-Link also offers cloud access, but it requires physical hardware installed locally within your home network to achieve that. Recently, TP-Link introduced a fully cloud-based controller, but the license requires purchase and is a bit expensive. So most users stick to the physical hardware, which is a bit less expensive than a complete cloud controller. But still, it is not 100% free.
 Step 3: In the search window, type Omada and you will see the Omada Controller image for Docker named mbentley/omada-controller.
Step 4: Double-click on it, and the image will be downloaded to your Synology NAS.
Step 3: In the search window, type Omada and you will see the Omada Controller image for Docker named mbentley/omada-controller.
Step 4: Double-click on it, and the image will be downloaded to your Synology NAS.
 Step 5: Once the download is completed, click on the Image option from the Docker dashboard. There you will see the downloaded Omada Docker image.
 Step 6: Double-click on the mbentley/omada-controller image to start the installation process. Proceed with the installation by keeping all the default settings.

 Step 7: Once the installation steps are completed, you can see the Omada Software Controller running from the Docker container section.
 Done! Now the Omada Software Controller is installed on your Synology NAS, and you can proceed with the setup and configuration process. For that, use the IP address of your Synology NAS. For example, if the IP address of your Synology NAS is 192.168.0.210, then you can access the Omada Controller with the corresponding port, which is 8088.
Step 8: Open your system browser and type your NAS IP address with the Omada Controller port. Since the IP address of your NAS is 192.168.0.210, you can type http://192.168.0.210:8088
and press Enter.
Step 9: Once you see the setup page, click the Let’s Get Started button and proceed with the initial setup. Finally, you can use the Omada Controller on your Synology NAS like the Omada Hardware Controller.
Note: The IP address used here (192.168.0.210) is just an example. You need to replace it with the actual IP address of your network-attached storage.
Done! Now the Omada Software Controller is installed on your Synology NAS, and you can proceed with the setup and configuration process. For that, use the IP address of your Synology NAS. For example, if the IP address of your Synology NAS is 192.168.0.210, then you can access the Omada Controller with the corresponding port, which is 8088.
Step 8: Open your system browser and type your NAS IP address with the Omada Controller port. Since the IP address of your NAS is 192.168.0.210, you can type http://192.168.0.210:8088
and press Enter.
Step 9: Once you see the setup page, click the Let’s Get Started button and proceed with the initial setup. Finally, you can use the Omada Controller on your Synology NAS like the Omada Hardware Controller.
Note: The IP address used here (192.168.0.210) is just an example. You need to replace it with the actual IP address of your network-attached storage.
How to Get a Free Omada Controller?
A free Omada Controller is technically possible, but it won’t be easy for everyone. To get a free Omada Controller, you must run the software controller on your local machine, such as a PC, laptop, Docker, or NAS. The downside here is that you need to run the local machine all the time to access the software controller to make any changes or to see the status of your devices. It won’t be feasible to run a PC or laptop 24×7 just to use the Omada Controller.What is Omada Controller?
Omada Controller is a central cloud controller by TP-Link that centrally manages all the TP-Link Omada devices simultaneously. You can connect and bind all the Omada devices within your home network to a single controller and manage them from a single dashboard rather than logging in to each device separately. The Omada Controller comes in two options: a hardware controller and a software controller. Now, a fully cloud-based controller is also available.Why is Omada Controller on NAS Important?
As mentioned before, the Omada Controller is a separate optional system. The hardware controller is a separate device that you must buy, costing around $100. On the other hand, you can use the Omada Software Controller, which can be installed on your local machine, and manage all the Omada devices using the software on a Windows PC or laptop. The software controller on a local machine has its downsides, as mentioned above. However, if you have a Docker container running within your Raspberry Pi or NAS, you can install and run it from there. Unlike a local machine like Windows or PC, a NAS runs continuously. Therefore, you can install and run the Omada Software Controller on your NAS and manage all the Omada devices connected to the controller without purchasing the hardware controller.TP-Link Omada Software Controller on Synology NAS
The Omada Software Controller can be installed on a NAS, and here, we tested it on a Synology DS420+ NAS. The Omada Controller can be installed as a Docker container image on the NAS. Since most NAS devices support running Docker containers, we can install the Omada Controller on a NAS and run it as a standard hardware controller without purchasing additional hardware.How to Install Omada Software Controller on Synology NAS
There are multiple ways to install the Omada Software Controller on a NAS, like a Synology NAS. However, installing it from the official Docker repository is the best and easiest way. Go to the Docker app on your Synology, search for Omada, and then install the official Docker image.Steps to Install Omada Software Controller on Synology NAS
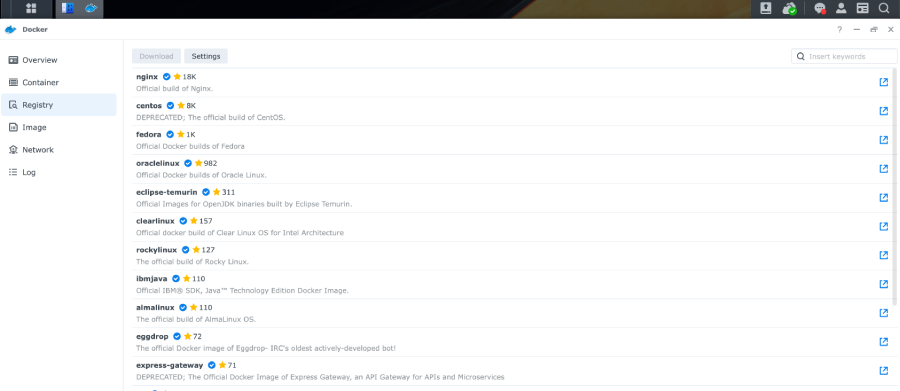
Before proceeding further, make sure to install Docker on your NAS. You can install Docker from the Package Center. Once installed, proceed to install the Omada Controller on the device. During the process, download the correct image file from Docker Hub. You can install the latest or older versions of the image as well. To know more, you can see the official repository page. Step 1: Open the Docker app from the control panel of your Synology NAS. Step 2: From the Docker dashboard, click on the Registry option on the left side.
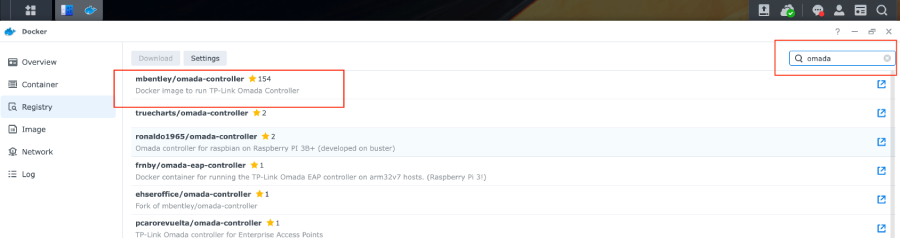
Step 3: In the search window, type Omada and you will see the Omada Controller image for Docker named mbentley/omada-controller.
Step 4: Double-click on it, and the image will be downloaded to your Synology NAS.
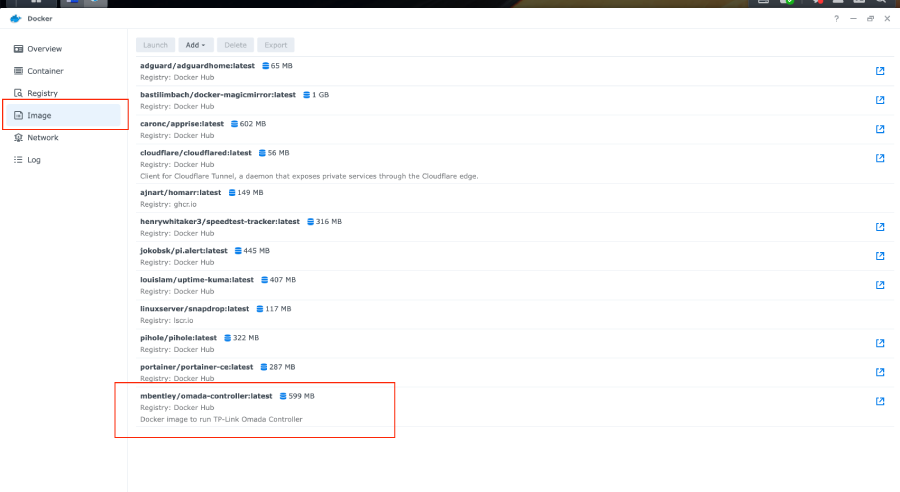
Step 5: Once the download is completed, click on the Image option from the Docker dashboard. There you will see the downloaded Omada Docker image.
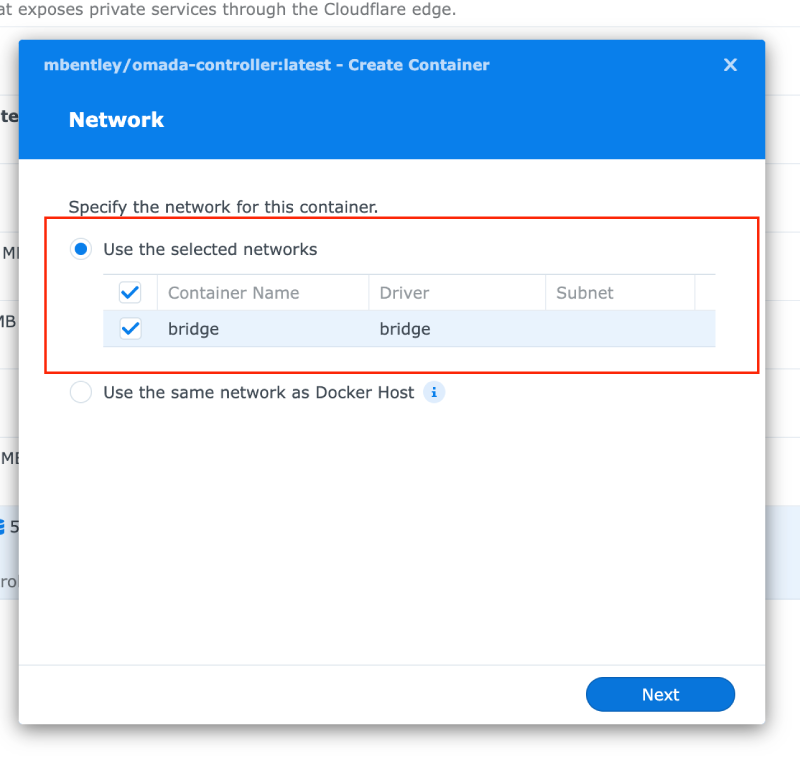
Step 6: Double-click on the mbentley/omada-controller image to start the installation process. Proceed with the installation by keeping all the default settings.
Step 7: Once the installation steps are completed, you can see the Omada Software Controller running from the Docker container section.
Done! Now the Omada Software Controller is installed on your Synology NAS, and you can proceed with the setup and configuration process. For that, use the IP address of your Synology NAS. For example, if the IP address of your Synology NAS is 192.168.0.210, then you can access the Omada Controller with the corresponding port, which is 8088.
Step 8: Open your system browser and type your NAS IP address with the Omada Controller port. Since the IP address of your NAS is 192.168.0.210, you can type http://192.168.0.210:8088
and press Enter.
Step 9: Once you see the setup page, click the Let’s Get Started button and proceed with the initial setup. Finally, you can use the Omada Controller on your Synology NAS like the Omada Hardware Controller.
Note: The IP address used here (192.168.0.210) is just an example. You need to replace it with the actual IP address of your network-attached storage.