While macOS Monterey is out now, the read-only external hard drive issue is still a problem for Monterey and Big Sur users. Many users have reported that their external hard drives are read only. So when they connect an external hard drive to Mac, they can only view files on the drive but can’t save any files or delete data from it. So here we are going to see the scenarios and the fixes for the issue on Mac.
How to Fix Read-Only External Drive on macOS Big Sur and macOS Monterey
This tutorial will show you three scenarios you may face and their corresponding solutions for your Mac, not reading an external hard drive or writing any data on your external hard drive, including new file creation, modifying or deleting data or files, etc. Let’s get to it. Please note that the core macOS is the same for all the versions, including the latest macOS Monterey, Big Sure, or the earlier. If you have recently upgraded your Mac from Big Sur to Monterey, in that case also, you can follow the same steps.
Case 1: The external hard drive is NTFS formatted
Right-click your external hard drive from the Desktop or Finder and select Get Info. You can see the format of the drive is NTFS. And it shows. You can only read from the bottom of the window.
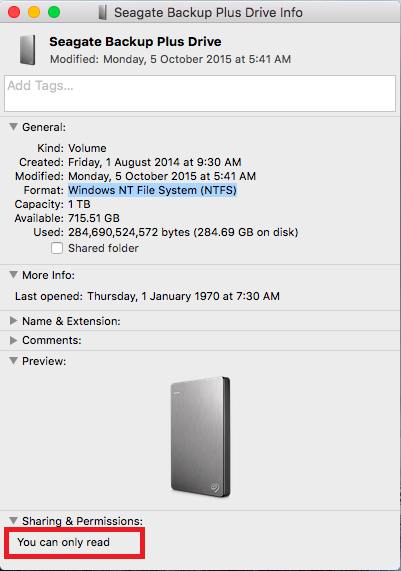
If so, that’s what the cause is. A cross-platform compatibility issue arises when the external disk you use has been previously formatted into NTFS. NTFS is the primary file system for recent versions of Windows. By default, Apple’s macOS can read files on NTFS drives but can’t write files to them out of the box.
Fortunately, you can quickly fix this issue by reformatting the device or using an additional driver.
Solution 1: Reformat the external hard drive in Disk Utility
You can format the external hard drive to a macOS file system format. That would fix the read-only issue.
Warning: To avoid data loss, you need to back up the external hard drive files before following this method.
Step 1: Navigate to Finder > Applications > Utilities > Disk Utility.
Step 2: Select the external hard drive from the left sidebar and click the Erase tab on the top toolbar.
Step 3: On the pop-up dialog box, give the drive a name, choose a format (APFS, Mac OS Extended Journaled, or exFAT is okay. But we would recommend you to select exFAT, which can be used on both Mac and Windows).
Step 4: Click Erase to confirm the process.

Solution 2: Use a third-party NTFS driver
If you think the method above is troublesome and worry about data loss, you can also download iBoysoft NTFS for Mac for free. iBoysoft NTFS for Mac is the first and only one compatible with macOS Big Sur and Apple Silicon Mac. It enables your Mac to write to NTFS drives automatically on macOS 11/10.15/10.14/10.13.
All you need is to install the software. Then you can set any of your Microsoft NTFS volumes in Finder as a startup drive. You can modify files on the NTFS drive, transfer files from your Mac to the drive, change the drive name, and Airdrop NTFS files. What’s more, you can reformat a drive to NTFS in Disk Utility and download files from network drives or cloud drives to NTFS volumes.
Here is how to use iBoysoft NTFS for Mac:
Step 1: Download and install iBoysoft NTFS for Mac.
Step 2: Restart your Mac computer, and then you can write to the NTFS external drive.

Case 2: The external hard drive is set in read-only permission
If you plug a drive on your Mac for the first time, the permission settings will get turned on by accident, which prevents the drive from working properly. As a result, the drive shows read-only on your Mac.
Solution: Ignore ownership permissions
You can easily change the setting and enable the drive to read and write the data. Here are the steps:
Step 1: Right-click the external hard drive and click on Get Info.
Step 2: Expand the Sharing & Permissions section and hit on the lock icon.
Step 3: input the admin password and then check Ignore ownership on this volume.

Case 3: The external hard drive is corrupted
Sometimes, formatting errors on your external hard drive will also make the device read-only.
Solution: Check and repair disk error via First Aid
You can use Disk Utility’s First Aid to verify and repair the external hard drive to see if the read-only issue is resolved.
Step 1: Head to Application > Utilities > Disk Utility.
Step 2: Highlight the external hard drive and click First Aid in the top center.

Step 3: Click Run. When the process is complete click Done to finish.
Conclusion
This post explains three Mac external hard drive read-only problem cases, their causes, and how to fix this error.
The most common reason would be the mismatched file system. If the external hard drive is in the NT file system format, macOS will treat the drive as read-only because NTFS, as one of the Windows file systems, is not compatible with macOS. The best fix is to use iBoysoft NTFS for Mac. With it, writing to NTFS drives is a piece of cake.