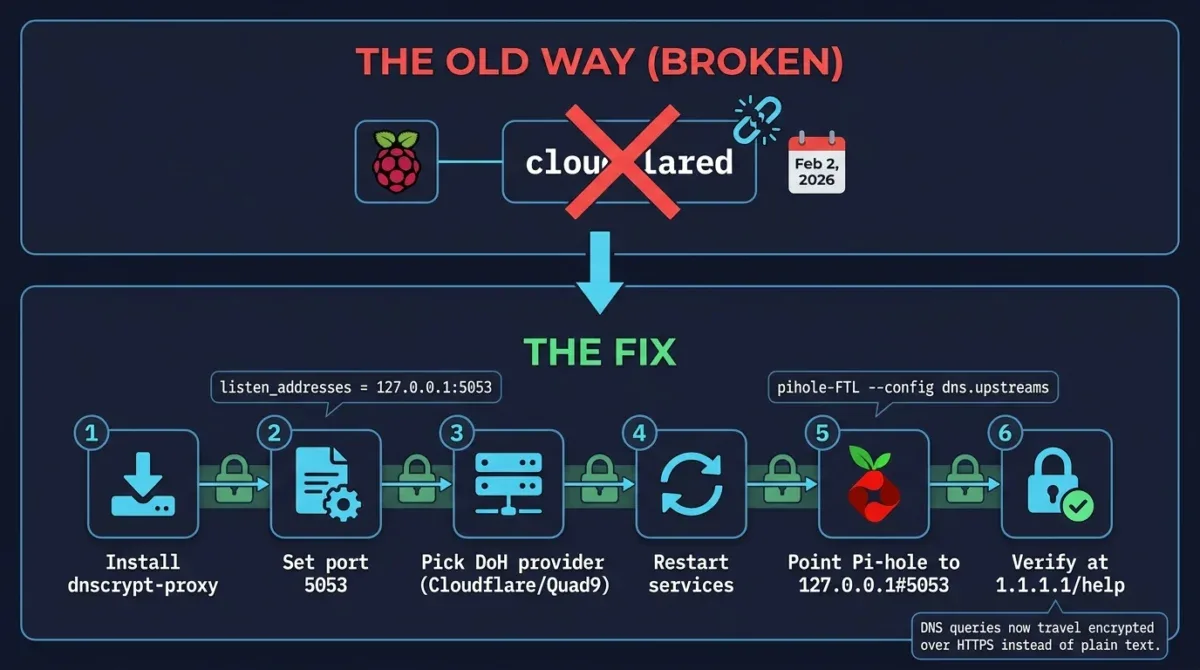
If you landed here from one of the older cloudflared tutorials, stop before you follow it — that method doesn’t work anymore. Cloudflare deprecated the proxy-dns feature those guides rely on back in November 2025, and as of July, 2026, it’s gone from all new cloudflared builds entirely. If you’ve got an old install still limping along, it’ll eventually break too. The tool that actually does the job now is dnscrypt-proxy, and honestly, it’s not any harder to set up.
Why cloudflared stopped working
Pi-hole was never built to speak DNS-over-HTTPS on its own — it just forwards whatever queries it gets to an upstream server you configure. For a long time, the easiest way to add encryption was running cloudflared locally as a DoH proxy and pointing Pi-hole at it. Cloudflare pulled that functionality due to a vulnerability in an underlying DNS library, and it’s not coming back. dnscrypt-proxy does the exact same job — sits locally, forwards your queries encrypted — and it’s actively maintained, so that’s the tool to use going forward.
What You’ll Need
- A working Pi-hole install (this guide assumes Pi-hole 6)
- SSH or terminal access to the machine running it
- Root or sudo privileges
Step 1: Stop cloudflared, If You Have It
Skip this if you’re starting fresh. If you’re migrating off an old cloudflared setup:
sudo systemctl stop cloudflared
sudo systemctl disable cloudflared
sudo cloudflared service uninstall
Step 2: Install dnscrypt-proxy
If you’re on Debian 13 (Trixie) or Ubuntu 25.04 and later, there’s an official package now:
sudo apt update
sudo apt install dnscrypt-proxy
On anything older — Raspberry Pi OS, Ubuntu 24.04, whatever — grab the binary straight from GitHub instead. This example is for arm64 (most modern Raspberry Pis); swap the filename for x86_64 on a regular PC/VM or arm for an older 32-bit Pi:
cd /opt
sudo wget https://github.com/DNSCrypt/dnscrypt-proxy/releases/latest/download/dnscrypt-proxy-linux_arm64.tar.gz
sudo tar -xzf dnscrypt-proxy-linux_arm64.tar.gz
sudo mv linux-arm64 dnscrypt-proxy
cd dnscrypt-proxy
sudo cp example-dnscrypt-proxy.toml dnscrypt-proxy.toml
sudo ./dnscrypt-proxy -service install
sudo ./dnscrypt-proxy -service start
Step 3: Set the DoH Upstream in the Config File
Open the config — /etc/dnscrypt-proxy/dnscrypt-proxy.toml if you installed via apt, or the path you extracted it to if you went the manual route:
sudo nano /etc/dnscrypt-proxy/dnscrypt-proxy.tomlTwo things to change. First, since Pi-hole’s FTL service already owns port 53, dnscrypt-proxy needs a different one:
listen_addresses = ['127.0.0.1:5053']Second, pick your upstream DoH provider(s):
server_names = ['cloudflare', 'quad9-dnscrypt-ip4-filter-pri']The full list of public resolvers to choose from is at dnscrypt.info/public-servers — Cloudflare, Quad9, and a bunch of others are all fair game.
If you installed via apt on Debian 13 / Ubuntu 25.04+, the package uses systemd socket activation and defaults to port 53, which will conflict with Pi-hole. Instead of editing
listen_addresses, override the socket directly:sudo systemctl edit dnscrypt-proxy.socketPaste this into the editor that opens, save, and exit:
[Socket]
ListenStream=
ListenDatagram=
ListenStream=127.0.0.1:5053
ListenDatagram=127.0.0.1:5053
Step 4: Restart Everything
sudo systemctl restart dnscrypt-proxy.socket
sudo systemctl restart dnscrypt-proxy.service
sudo systemctl restart pihole-FTL.service
(If you installed manually via the tarball method, it’s just sudo systemctl restart dnscrypt-proxy instead.)
Confirm it actually started:
sudo systemctl status dnscrypt-proxyYou want to see active (running). If it’s not, check the config file for typos — a bad TOML syntax will silently kill the service.
Step 5: Point Pi-hole at It
Fastest way is the CLI:
sudo pihole-FTL --config dns.upstreams '["127.0.0.1#5053"]'Or do it through the web interface: log into http://pi.hole/admin, go to Settings > DNS, uncheck any default upstream providers that are ticked, scroll down to Custom DNS Servers (IPv4), type in 127.0.0.1#5053, and hit Save & Apply.
Step 6: Confirm the Queries Are Actually Encrypted
From any device that’s using Pi-hole for DNS, open a browser and go to 1.1.1.1/help — under “Debug Information” you should see Using DNS over HTTPS (DoH): Yes. Heads up, that checker only recognizes Cloudflare — if you picked Quad9 or another provider, it won’t show a match even though DoH is working fine. In that case, dnsleaktest.com is a better sanity check.
Worth knowing before you assume you’re fully anonymous now: DoH hides your DNS traffic from your ISP, not from whichever provider you picked as the upstream. Cloudflare, Quad9, or whoever you chose can still see every domain you’re looking up. If that bothers you, the next step up is running Unbound as a recursive resolver instead of forwarding to a third party — more setup involved, but it skips outside DNS providers almost entirely.