SSDs have pretty much taken over, and honestly, it’s hard to argue against them. HDDs aren’t completely dead — they still make sense for bulk storage where cost matters — but for day-to-day computing, solid state is where things are headed.
Solid State Drives have gone from a premium luxury to the standard in most mid-range and high-end machines. Whether you’re picking up a gaming laptop with an RTX 3060 or shopping for a capable budget machine, there’s a good chance it’s running on SATA or NVMe SSD storage. The speed difference compared to a traditional spinning drive is immediately noticeable — from boot times to how fast apps actually open.
That said, plenty of budget laptops still ship with HDDs, and some even pair both a small SSD with a larger HDD for a bit of both worlds. The tradeoff is simple: HDDs are cheaper per gigabyte, which makes them attractive for storage-heavy use. But if you’ve ever used an SSD and then gone back to an HDD, you’ll know that’s a hard thing to do voluntarily.
If you’ve just picked up a new laptop and aren’t sure what kind of storage it has — or whether it has both — you don’t need to crack it open or dig through the manual. Windows gives you several built-in ways to check, and I’ll walk you through all of them.
What is SSD in a Laptop/PC?
An SSD, or Solid State Drive, is the storage technology you’ll find in most modern laptops. Unlike a traditional hard drive, it has no moving parts — all the data is stored on integrated circuits (basically, chips). That alone changes everything about how it performs.
SSDs do the same job as a hard drive — they hold your operating system, apps, and files — but they do it noticeably faster. Your machine boots up quicker, programs launch without that annoying lag, and saving large files takes a fraction of the time.
A traditional HDD, by comparison, works by spinning a magnetic disc while a read/write head moves across it to find and write data. It works, and it’s been reliable for decades, but the mechanical nature of it means there’s a ceiling on how fast it can go — and more ways things can go wrong over time.
The speed of SSDs in computers is really what’s driven their popularity. No moving parts means faster access times, quicker startups, and better performance under heavy workloads. They’re also easier to install if you ever need to swap one out.
How to check what SSD I have on a laptop?
There are actually quite a few ways to do this on Windows, and none of them require any special software. Here are the most reliable methods.
Check SSD Using Device Manager
Device Manager is probably the quickest route. It’s built into Windows and takes about 30 seconds to give you the information you need.
Step 1: Click the Start button and search for Device Manager.

Step 2: Once Device Manager opens, look through the list for Disk Drives and expand it.
Step 3: You’ll see all the storage devices currently installed in your laptop listed there.

The drive name usually tells you what you need to know. If the name alone doesn’t make it obvious, just copy it and run a quick Google search — you’ll find the specs in seconds.
Check SSD Using Task Manager
Step 1: Open Task Manager with Ctrl + Shift + Esc, or right-click the Taskbar and select Task Manager. Worth noting: the right-click Taskbar option isn’t available on Windows 11. To Open the Task Manager in Windows 11, use Search or the Ctrl + Shift + Esc keys instead.
Step 2: If Task Manager opens in its compact view, click “More information” to switch to the full view.
Step 3: Head over to the Performance tab and click on the disk listed on the left side. The drive name will appear on the right, and it usually indicates whether you’re looking at an SSD or HDD.
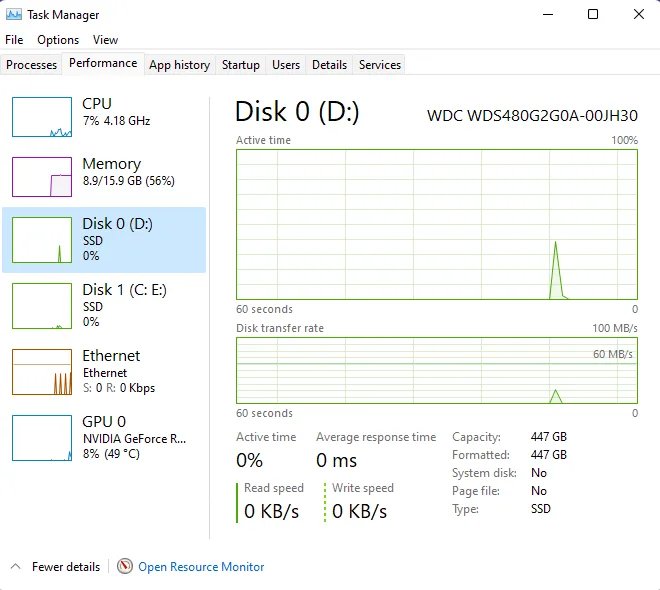
If the drive name isn’t clear enough on its own, look at the small tag just below “Disk” on the left panel — it should explicitly say SSD or HDD. (You can see this highlighted in the screenshot above.)
Check SSD Using Disk Management
Step 1: Right-click the Start button on the Taskbar and choose Disk Management from the menu.
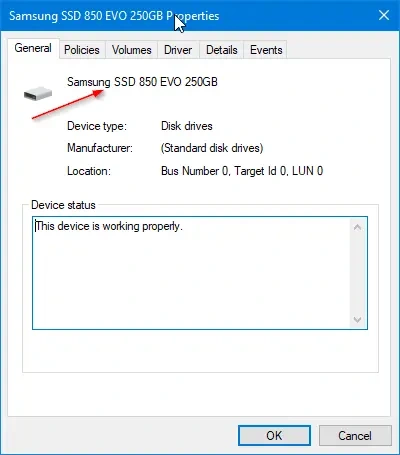
Step 2: The left side of the Disk Management window lists all your internal and external drives. Right-click the drive you want to check and select Properties.
Step 3: Under the General tab, you’ll see the drive’s full name, which typically tells you whether it’s an SSD or HDD.
Same deal as before — if the name doesn’t immediately tell you the drive type, a quick Google search of that model name will sort it out.
Check SSD Using File Explorer
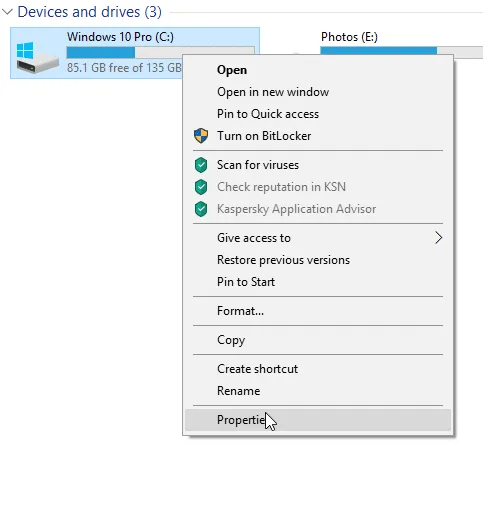
Step 1: Open File Explorer from the Taskbar and navigate to This PC.
Step 2: Right-click on one of the partition drives and select Properties. If your machine has more than one physical drive, make sure you right-click a partition that belongs to the specific drive you’re trying to identify.
Step 3: Click over to the Hardware tab. You’ll see whether your drive is an SSD or HDD listed there.

Check SSD Using Powershell
PowerShell is a handy option if the other methods haven’t given you a clear answer. It’s available on Windows 10 and later, and it gives you a direct readout of your drive type. You can use it to use it alongside other tools, but honestly, it’s often the clearest method when drive names are ambiguous.
Step 1: Right-click the Start button and choose PowerShell (Admin).
Step 2: Type Get-PhysicalDisk and hit Enter. The command is case-sensitive, so type it exactly as shown.
Step 3: Once the command runs, look at the Media Type column — it will list whether your drive is an SSD or HDD directly.

This method is especially useful when the drive name itself gives nothing away. The Media Type column cuts straight to the answer.
Check SSD Using Defragmenter
The Defragment and Optimize Drives tool — which most people only think about for maintenance — also happens to show you your drive type right in the main window.
Step 1: Right-click the Start button and select Run.
Step 2: In the Run dialog, type dfrgui and press OK.
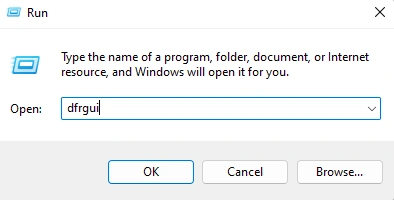
Step 3: The window that opens lists all your drives along with their Media Type — you’ll see at a glance whether each one is SSD or HDD.

As you can see in the screenshot above, this particular laptop is running SSD storage.
Conclusion
SSDs are faster and more reliable than HDDs — the performance difference is real, and it’s why they’ve become the go-to option despite the higher price tag. If you weren’t sure what your laptop was running, hopefully one of these methods gave you a clear answer.
Beyond just knowing whether you have an SSD or HDD, these steps also help you identify the specific brand and model of your drive — which can be useful if you’re thinking about an upgrade or just want to know what you’re working with. For more detailed information about your SSD’s health and specs, you can also check more advanced features and information about your SSD using third-party apps like CPU-Z.
Hope this guide on how to check what SSD your laptop has cleared things up — both the SSD vs. HDD question and how to figure out exactly which drive you’re running.