


Although Facebook’s popularity has waned compared to its early days, it remains a widely used platform for sharing content, staying connected, and networking. Users often post updates, photos, and other content that stays on their timeline indefinitely. However, there may come a time when you need to clean up your profile by deleting all or some posts for personal, professional, or privacy reasons.
If you’re looking for an efficient way to delete multiple Facebook posts at once, this tutorial will guide you through a simple step-by-step process. For better navigation and convenience, it’s recommended to perform these steps on a desktop or laptop.
Step-by-Step Process to Delete Facebook Posts in Bulk
Step 1: Log in to Your Facebook Account
Begin by logging into your Facebook account on a web browser. Once logged in, navigate to your profile page by clicking on your profile picture or name from the top menu bar.
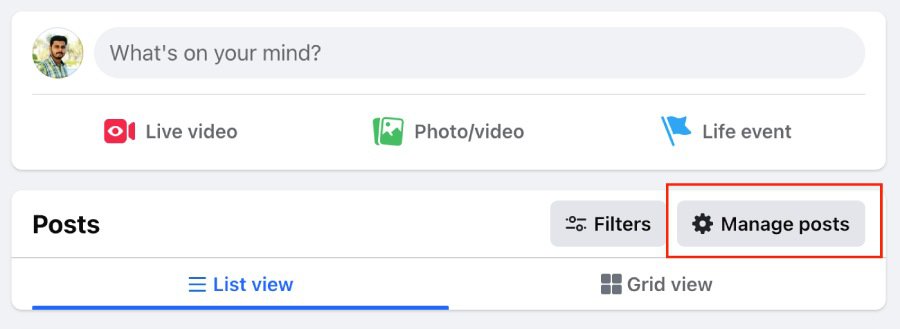
Step 2: Access the Manage Posts Feature
On your profile page, locate the area near the “New Post” creation section. Click on the ‘Manage Posts’ button, which allows you to view and manage all your past posts.
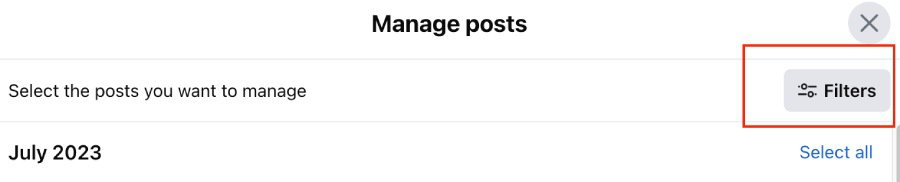
Step 3: Open the Filters Option
After clicking on “Manage Posts,” a pop-up window will appear displaying all your posts. In the upper-right corner of this pop-up, you’ll find the ‘Filters’ button. Click on it to refine your search and locate specific posts.
Step 4: Apply Filters to Narrow Down Your Posts
The filter options provide multiple choices, such as:
- Date: Filter posts by year and month.
- Post By: Choose posts created by you, shared by others, or tagged posts.
- Privacy: Select posts visible to the public, friends, or only you.
- Tagged Posts: Include or exclude posts where you’re tagged.
For example, if you wish to delete all posts created in February 2024, set the filters as:
- Year: 2024
- Month: February
- Post By: You
Once you’ve set the desired filters, click the ‘Done’ button to proceed.

Step 5: Select Posts to Delete
You will now see the filtered list of posts in the same pop-up window. You can:
- Select posts individually: Manually choose posts you want to delete.
- Select all posts: Bulk-select all posts displayed in the filter results.
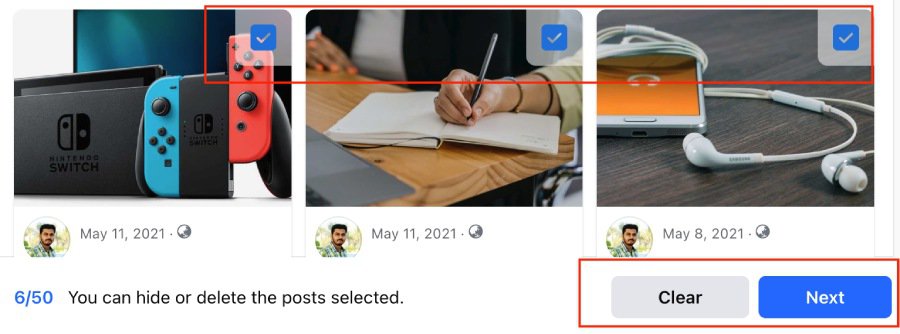
Step 6: Confirm Your Action
After selecting the posts, click the ‘Next’ button to proceed. This will bring up the final options for managing the selected posts.
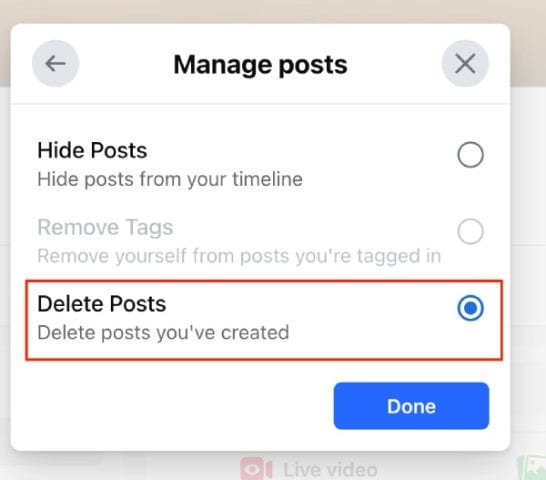
Step 7: Choose Between Hiding or Deleting Posts
In the final pop-up window, you will see two options:
- Hide Posts: This removes the posts from your timeline but keeps them accessible to you privately.
- Delete Posts: This permanently deletes the posts, and they cannot be recovered.
Since you want to delete the posts, select ‘Delete Posts’ and click ‘Done’ to confirm.
And That’s It!
Your selected posts have now been successfully deleted from your Facebook profile. These posts will no longer be visible to anyone, ensuring your feed is cleaner and aligned with your preferences.
Additional Tip: Hide Posts Instead of Deleting
If you’re unsure about permanently deleting certain posts, you can choose the ‘Hide Posts’ option instead. This allows you to remove them from public view while keeping them accessible for future reference or memories.
Why Clean Up Your Facebook Posts?
Regularly managing your Facebook profile can have multiple benefits:
- Enhance Privacy: Remove old posts that may contain sensitive or outdated information.
- Professional Image: Ensure your profile reflects your current values and professionalism.
- Organized Timeline: Clear unnecessary clutter and make your timeline more meaningful.
Taking a few moments to clean up your Facebook account can contribute to a more curated and intentional online presence.